
Last week I tried the Raspberry Pi Pico with MicroPython. The Raspberry Pi Foundation would be sufficiently commended for providing only this level of programming support. MicroPython leverages the Python skills of the many Raspberry Pi users out there and is accessible to plenty of others too. But the Foundation has also provided a C/C++ SDK, and this opens the Pico up to serious embedded-system developers too.

Programming in C or C++ brings you so much closer to the bare metal than an interpreted language like Python can. With the SDK, you’re not totally there: compiling a simple Hello, World program, for example, generates a very small binary but it’s still a little larger than you might expect. There is a lot of ancillary code added by the SDK in there too. That’s inevitable: this way you don’t have to worry about the complexities of installing your code into the correct part of the target chip’s memory map and can instead focus on your application code.
For those of us who aren’t experienced embedded developers, the SDK is set up to generate .uf2 files so that you can just mount the Pico’s internal storage on your computer and drag the binary across, just as you would with MicroPython source. When you do, the Pico reboots, installs the compiled code and runs it.
This approach is convenient for embedded newbies, but it’s a faff having to re-mount your Pico every time you update your code — not to mention tough on the USB connector. The Pico supports a much better alternative: Serial Wire Debug (SWD), accessed through the three pins marked DEBUG on the far edge from the USB connector.
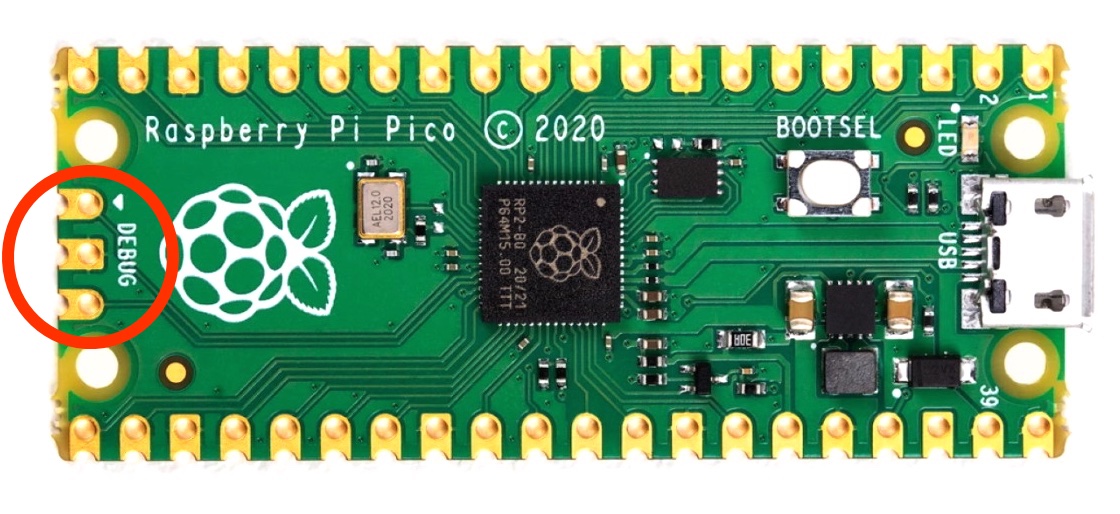
These SWD pins can be used for transferring code to the Pico without all that tedious plugging and unplugging of USB cables. More to the point, it is used to enable on-chip debugging so that you can see how your code is operating on the machine and do useful things like set breakpoints so you can pause the program to check the value of variables and such. This is much better way of debugging development code, but working with SWD on a Mac is not straightforward, so I’ll be covering it separately.
Installing the Tools
First, though this is how you set up your Pico toolchain on a Mac. The Foundation documents this, but different parts of the setup are covered in different places, so here is my combined, tested sequence. As an example, I’ll use the directory ~/git as the base installation location and the project name PicoTest, but you can use whatever paths and names you prefer, of course.
- Install the SDK:
- In Terminal, go to your projects directory, eg.
~/git - Run
git clone -b master --recurse-submoduleshttps://github.com/raspberrypi/pico-sdk.git - Edit your
.bash_profileor.zshrcand add:export PICO_SDK_PATH="$HOME/git/pico-sdk"
- In Terminal, go to your projects directory, eg.
- Install the toolchain:
brew install cmakebrew tap ArmMbed/homebrew-formulaebrew install arm-none-eabi-gcc
- Configure the IDE:
- Run — or install and then run — Microsoft Visual Studio Code.
- Click on the Extensions icon.
- Enter
CMake Toolsin the search field. - Locate CMake Tools by Microsoft and click Install.
- Set up a project:
mkdir PicoTestcd PicoTestcp ../pico-sdk/external/pico_sdk_import.cmake .- Create
CMakeLists.txt— see listing below. touch source.hecho '#include "source.h"' > source.c
- From within Visual Studio Code, open the folder
PicoTest. - When CMakeTools asks you if to configure project, say yes.
- When asked to select a kit, select GCC for arm-none-eabi x.y.z.
The CMakeLists.txt file mentioned in step 4.4 is the configuration file for CMake, which organises the compiling and linking of the code. Here is some boilerplate for the project’s CMakeLists.txt file:
# What CMake to start at
cmake_minimum_required(VERSION 3.12)

# Include the subsidiary .cmake file to get the SDK
include(pico_sdk_import.cmake)

# Set the name and version of the project
project(PicoTest VERSION 1.0.0)

# Link the Project to a source file (step 4.6)
add_executable(PicoTest source.c)

# Link the Project to an extra library (pico_stdlib)
target_link_libraries(PicoTest pico_stdlib)

# Initalise the SDK
pico_sdk_init()

# Enable USB, UART output
pico_enable_stdio_usb(PicoTest 1)
pico_enable_stdio_uart(PicoTest 1)

# Enable extra outputs (SWD?)
pico_add_extra_outputs(PicoTest)
Your source.h file will grow as you add function prototypes, #define statements and so on, but you’ll need start with some basic #include statements:
#include <stdio.h>
#include "pico/stdlib.h"

When you go beyond the basic Hello, World examples in the manual, you’ll start using other Pico libraries. Make sure you add them to the CMakeLists.txt file’s target_link_libraries() call. You can tell when you have forgotten to do this: compiling will fail with an error at one of your #include lines.
There’s not a 1:1 correspondence between the library name and the relevant #include. For example, to use I²C, you add #include "hardware/i2c.h" to your source, but the name you add to target_link_libraries() is hardware_i2c.
The library names are listed in the Pico C/C++ SDK documentation.
Projects
Once the toolchain is in place, setting up a project — step 4 — is straightforward. So I just turned it into a shell script, which you can find in my pi-pico repository on GitHub. Just run it in the Terminal as follows with a path to the project folder you’d like to create — makepico takes the project name from the last item on the path:
makepico ~/my_pico_projects/killer_iot_device
It will create the folder, add stub source files (.h and .c) and configure a CMakeLists.txt for you.
With the project in view in Visual Studio Code, you can write some code in your .c file and then you just click Build in the status bar at the bottom to compile it. Assuming that completes without error, you’ll have a build directory under ~/git/PicoTest/ and inside that a PicoTest.uf2 that you can drag to the Pico’s mounted storage. On a raw board, this will mount automatically. If you have already copied a file over, you’ll need to hold down the BOOTSEL button while you connect the Pico to a Mac USB port, and then release it.

Examples
The Foundation has a wealth of Pico C programming examples over at GitHub. They cover all of the Pico’s hardware features, including its Programmable IO (PIO) system for assembly-style DIY bus programming, so there’s plenty there to get you started, whatever your project. Rather the download them all, as the official documentation guides you to do, you may prefer just to view the code as you need to. My setup sequence assumes that’s what you’ll do.
Next Time…
I’ll show you how to make use of the Pico’s handy SWD header for software loading and on-chip debugging.
More on the Raspberry Pi Pico
- How to build a cellular IoT device with the Raspberry Pi Pico — part two, the code
- How to build a cellular IoT device with the Pico — part one, the hardware
- How to pop up a Picoprobe from the Adafruit QT Py RP2040
- Raspberry Pi Pico proxies: the Pimoroni Tiny 2040 and the Adafruit QT Py RP2040
- Introducing C++ programming on the Raspberry Pi Pico
- Enjoy some old school 3D arcade action — courtesy of the Raspberry Pi Pico
- Play Hunt the Wumpus, Raspberry Pi Pico style
- How to Debug a Raspberry Pi Pico with a Mac, SWD and… another Pico
- A First Look at a MicroPython Marvel: The Raspberry Pi Pico

Hm, nice but I wait for platformio-support
Pingback: How to program the Raspberry Pi Pico in C on a Mac « Adafruit Industries – Makers, hackers, artists, designers and engineers!
Pingback: How to develop for the Raspberry Pi Pico on a Mac – Raspberry Pi Pod and micro:bit base
Noice! Thanks Tone, I’ve ordered a pico to play with.