
Having spent some time with the Raspberry Pi Pico, I thought it was time to try out some of the other RP2040-based development boards that have become available. When it launched the Pico, the Raspberry Pi Foundation said it would make its RP2040 microcontroller available to third-party board makers. Retailers Pimoroni and Adafruit were among the first to toss their caps into the ring. Their offerings: respectively, the Tiny 2040 and the QT Py RP2040.

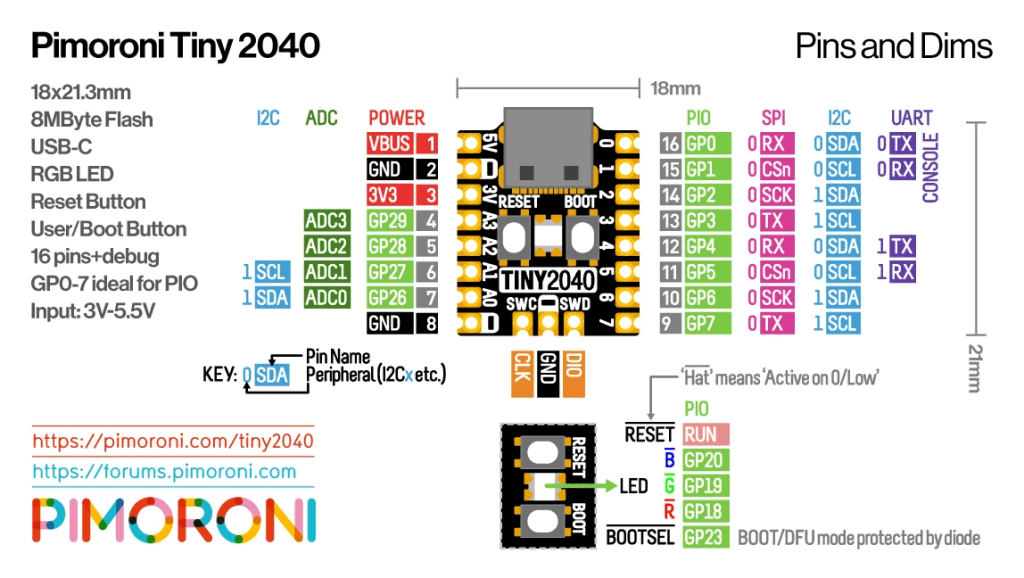
Both boards are roughly a third of size of the Pico, but crammed with almost all of the latter’s board-level features. There are three notable exceptions. First, both of the smaller products incorporate a reset button so you can reboot them without having to yank the power cable.

Second, both the QT Py RP2040 and the Tiny 2040 incorporate a USB-C connector for data and power. This makes plugging and replugging cables much more pleasant with these than it does with the Pico. Smooth and reversible USB-C is is infinitely better than the Pico’s fiddly and latched USB Micro connector. Unless you’re using SWD — more on this in a moment — you’ll be juggling cables quite a bit as you transfer updated versions of your code to the microcontroller.
Third, both little boards have a user-programmable RGB LED — a NeoPixel in the case of the QT Py RP2040.

Inevitably the smaller size means a compromise on pinout. Check first that the pins available on these boards meet the needs of your project. Suffice it to say, both the QT Py RP2040 and the Tiny 2040 have a decent selection of IO; there’s not much to choose between them on connectivity. Certainly nothing leaps out of either device’s pinout chart as obvious omissions or advantages over its rival’s setup. For example, both can run my Pico games Hunt the Wumpus and Phantom Slayer with only minor wiring and pin definition tweaks.

The QT Py RP2040, being an Adafruit product, is unsurprisingly well supported by CircuitPython, but so is the Tiny 2040, with its own CircuitPython build. You can run MicroPython instead, if you prefer. I got both up and running with the standard Pico build.
Whichever MCU-oriented Python flavour you prefer, just press the Boot Select button — marked BOOT on the QT Py and Tiny — and connect the board to your computer. Now drop the downloaded firmware’s .UF2 file into the USB drive that has appeared. Python is ready to use.

You install bare-metal code compiled using the Raspberry Pi foundation’s Pico C/C++ SDK tools the same way: compile your C/C++ code and drop the resulting .UF2 file into the board’s mounted drive.
I ran my HT16K33 Python library’s sample code straight off under CircuitPython, and the only reason the equivalent C code didn’t run was because, in my eagerness, I forgot to change which the GPIO pins I2C0’s SDA and SCL lines follow. In other words, it did run, but I couldn’t tell because the display’s segment LEDs weren’t illuminated. One quick fix and rebuild later, and app and display were working just fine.
If you’re working on a C or C++ project, the Tiny 2040 has the edge over the QT Py RP2040 because it incorporates Serial Wire Debug (SWD) pins just the like the Pico does. This means you can hook it straight to a Pico configured as a Picoprobe, or to a Raspberry Pi, and not only download newly compiled code without having to faff about with BOOTSEL and USB cables, but you can run code through a debugger.
You can read all about SWD on the Pico here. One thing I did notice with the Tiny 2040: I needed to connect both the SWD header’s GND pin and the board’s GND pin to GND on the Picoprobe. With the Pico, I just connect the SWD GND. When I did that with the Tiny 2040, I got SWD timeouts. I’ve taken these to be a sign of bad grounding. Sure enough, when I connected the Tiny 2040’s main GND pin to the Picoprobe’s, SWD worked a treat.

For me, SWD support is worth more than the STEMMA QT port on the QT Py RP2040, but of course your project’s needs may be different and the tiny connector may very well be what swings it for you.
And here’s a fun fact: with a minor code modification, you can use either the QT Py RP2040 or the Tiny 2040 as a Picoprobe — a device you can use to program and debug the RP2040 directly if you’re working on something other than the Raspberry Pi. The Foundation’s Picoprobe code makes use of GPIO pins 2 and 3. You can change this by editing picoprobe_config.h and changing either the value of PROBE_PIN_OFFSET, or the values of PROBE_PIN_SWCLK and PROBE_PIN_SWDIO. These define which GPIO pins are used for SWD communications.
For example, set PROBE_PIN_OFFSET to 3 and you can use the pins marked MO and MI on the QT Py RP2404 silkscreen. Build the picoprobe.uf2 file, copy it to the device, and you have a much more compact Picoprobe. It’s what I’m now doing with mine, freeing up a Pico for other projects.
Both little boards have 8MB of Flash storage, four times the Pico’s 2MB. But the Pico wins on price. A fresh Pico will cost you £3, plus a pound or so for header pins. The other boards bundle header pins, but cost more than twice as much as the Pico does. Note that Pimoroni’s bundled header pins don’t stretch to the SWD header.

Yes, they have USB-C ports, but unless you’re changing your code frequently, that’s no big deal, particularly if you use SWD. The RGB LED is nice to have, but not essential. For some projects, though, the extra storage capacity will be a winner.
The Adafruit and Pimoroni boards have size on their side too, but then again how many home-built projects are that dependent on the area of the board?
At the time of writing, Pimoroni is charging just £1.80 for a Pico, so you have have four of them for the price of one Tiny 2040 (£8.40), or five for the price of one QTPy (£9). In either case, that’s a big mark-up for compact size, an RGB LED, an extra 6MB of storage and USB-C.
Of the two, I would select the Tiny 2040, for its slightly lower price and SWD support. But there’s little else to separate the two boards, cute but costly as they both are.
More on the Raspberry Pi Pico
- How to build a cellular IoT device with the Raspberry Pi Pico — part two, the code
- How to build a cellular IoT device with the Pico — part one, the hardware
- How to pop up a Picoprobe from the Adafruit QT Py RP2040
- Introducing C++ programming on the Raspberry Pi Pico
- Enjoy some old school 3D arcade action — courtesy of the Raspberry Pi Pico
- Play Hunt the Wumpus, Raspberry Pi Pico style
- How to Debug a Raspberry Pi Pico with a Mac, SWD and… another Pico
- How to program the Raspberry Pi Pico in C on a Mac
- A First Look at a MicroPython Marvel: The Raspberry Pi Pico
