
Here’s something a little different: a basic C project that you can follow to build a fun handheld game with a Raspberry Pi Pico. Your mission: to enter a dark cave, and then locate and destroy the monstrous Wumpus.

The trouble is, the cave is dark and you have no torch. All you have is your sense of smell to tell you when the beast is near. And as if that wasn’t enough, the cave contains many lethally deep pits. The local population of giant bats are out to bamboozle you too…

Hunt the Wumpus is easy to build. All you need are a handful of components which you can easily buy from electronics suppliers and eBay.
Credit where it’s due, though: this version of Hunt the Wumpus was devised a few years ago by Corey Faure, who implemented it on the Arduino. I clocked it at the time and planned to built it myself one day, but never got round to it until I was casting around for Pico projects.
The game has some nice elements for Pico-isation. While I had already driven a display over I²C, now I could not only use GPIO for the LEDs and the switch, but also as analog input for a joystick control. The design’s inclusion of a piezo-electric buzzer would allow me to bit-bang the game’s chip tunes.
The Game
So how do you play? You use the joystick to move square by square through the cave. The display shows your path.
The red LED will light when there is a pit in an adjacent square. Don’t step on a pit — the fall will kill you. If there is more than one nearby pit, you’ll need to tread very carefully…
You’ll sometimes hear on the piezo speaker the twitter of a bat an adjacent square. If you move into its square, it will carry you to a random part of the cave.

The green LED will light when the Wumpus is in an adjacent square. Don’t get any closer — the Wumpus will eat you. Instead, press the button to fire an arrow that will kill the monster.
To choose the direction in which the arrow is loosed, step back and move toward the Wumpus’ square in the direction you want to the arrow to go. Make sure you get it right: if you miss, the beast will know where you are and immediately grab you!

If your aim is true, you will defeat the Wumpus and receive a glittering trophy as reward for your success.
Required Components
In addition to a Pico, you will need:
- One or two breadboards.
- An 8×8 LED matrix display with as I²C backpack.
- A red LED.
- A green LED.
- A piezo-electric buzzer.
- A button.
- A two-way, self-centring analog joystick.
Assemble the Hardware
I built this on a couple of standard breadboards, one for the controls, the other for everything else, but you can squeeze it onto a single, large board. Here’s my layout:

The Pico has plenty of GPIO and I²C choices, but you’ll be limited to just four pins for analog input. That aside, it won’t be hard to alter the layout if you wish.
You need three GPIO outputs for the speaker and two LEDs, one GPIO input for the button, and two I²C pins for the display.
In the diagram, the LEDs are shown where I placed them, but that makes the layout unclear there. Just remember to connect the long pins to the Pico and the short pins to GND.
The joystick shown is not the one I used. Mine has four pins, not five. These are VCC, GND, X and Y — the latter are the ones the code reads to check whether the player has moved.
Build the Code
You can find the game’s code in my pi-pico repo.
- Open the folder in Visual Studio Code.
- Click the Build button at the bottom of the window to compile the code and create a
wumpus.uf2file. - Press the BOOTSET button on the Pico and connect it to a USB cable plugged into your computer.
- Drag over the
wumpus.uf2file from the project’s build folder. - Play!
What the code does
Most of the code is straightforward. The entry point starts a loop in which the intro animation and tune are played, the game map initialised and the game play loop started. This continues until you win or lose, in which cases we break out of the play loop and go round the outer loop again to set up the next game.
Within a game, the code checks for movement: was the joystick moved outside of a central ‘deadzone’? If the player moves, the code determines their new location, there’s a check to see what they will sense there — nearby pit, bat or Wumpus — and then we see if the player actually encountered one of these hazards.
Assuming the player hasn’t been killed, we update their path on the 8×8 display, pause for breath and then loop.
When reading button presses — to fire an arrow at the Wumpus — the code includes a debounce period to smooth out unwanted oscillations across the button’s contacts from sending misleading readings. The code also makes sure the joystick has to be re-centred — this prevents the player from moving continuously and quickly, and running onto a hazard before registering the signal LED or speaker tone.
Speaking of which, the Pico has no equivalent of the Arduino tone() call, so I wrote a crude version that plays a tone of the required frequency for a specified duration. Because the original code always follows this with a pause, I built that into the tone function too.
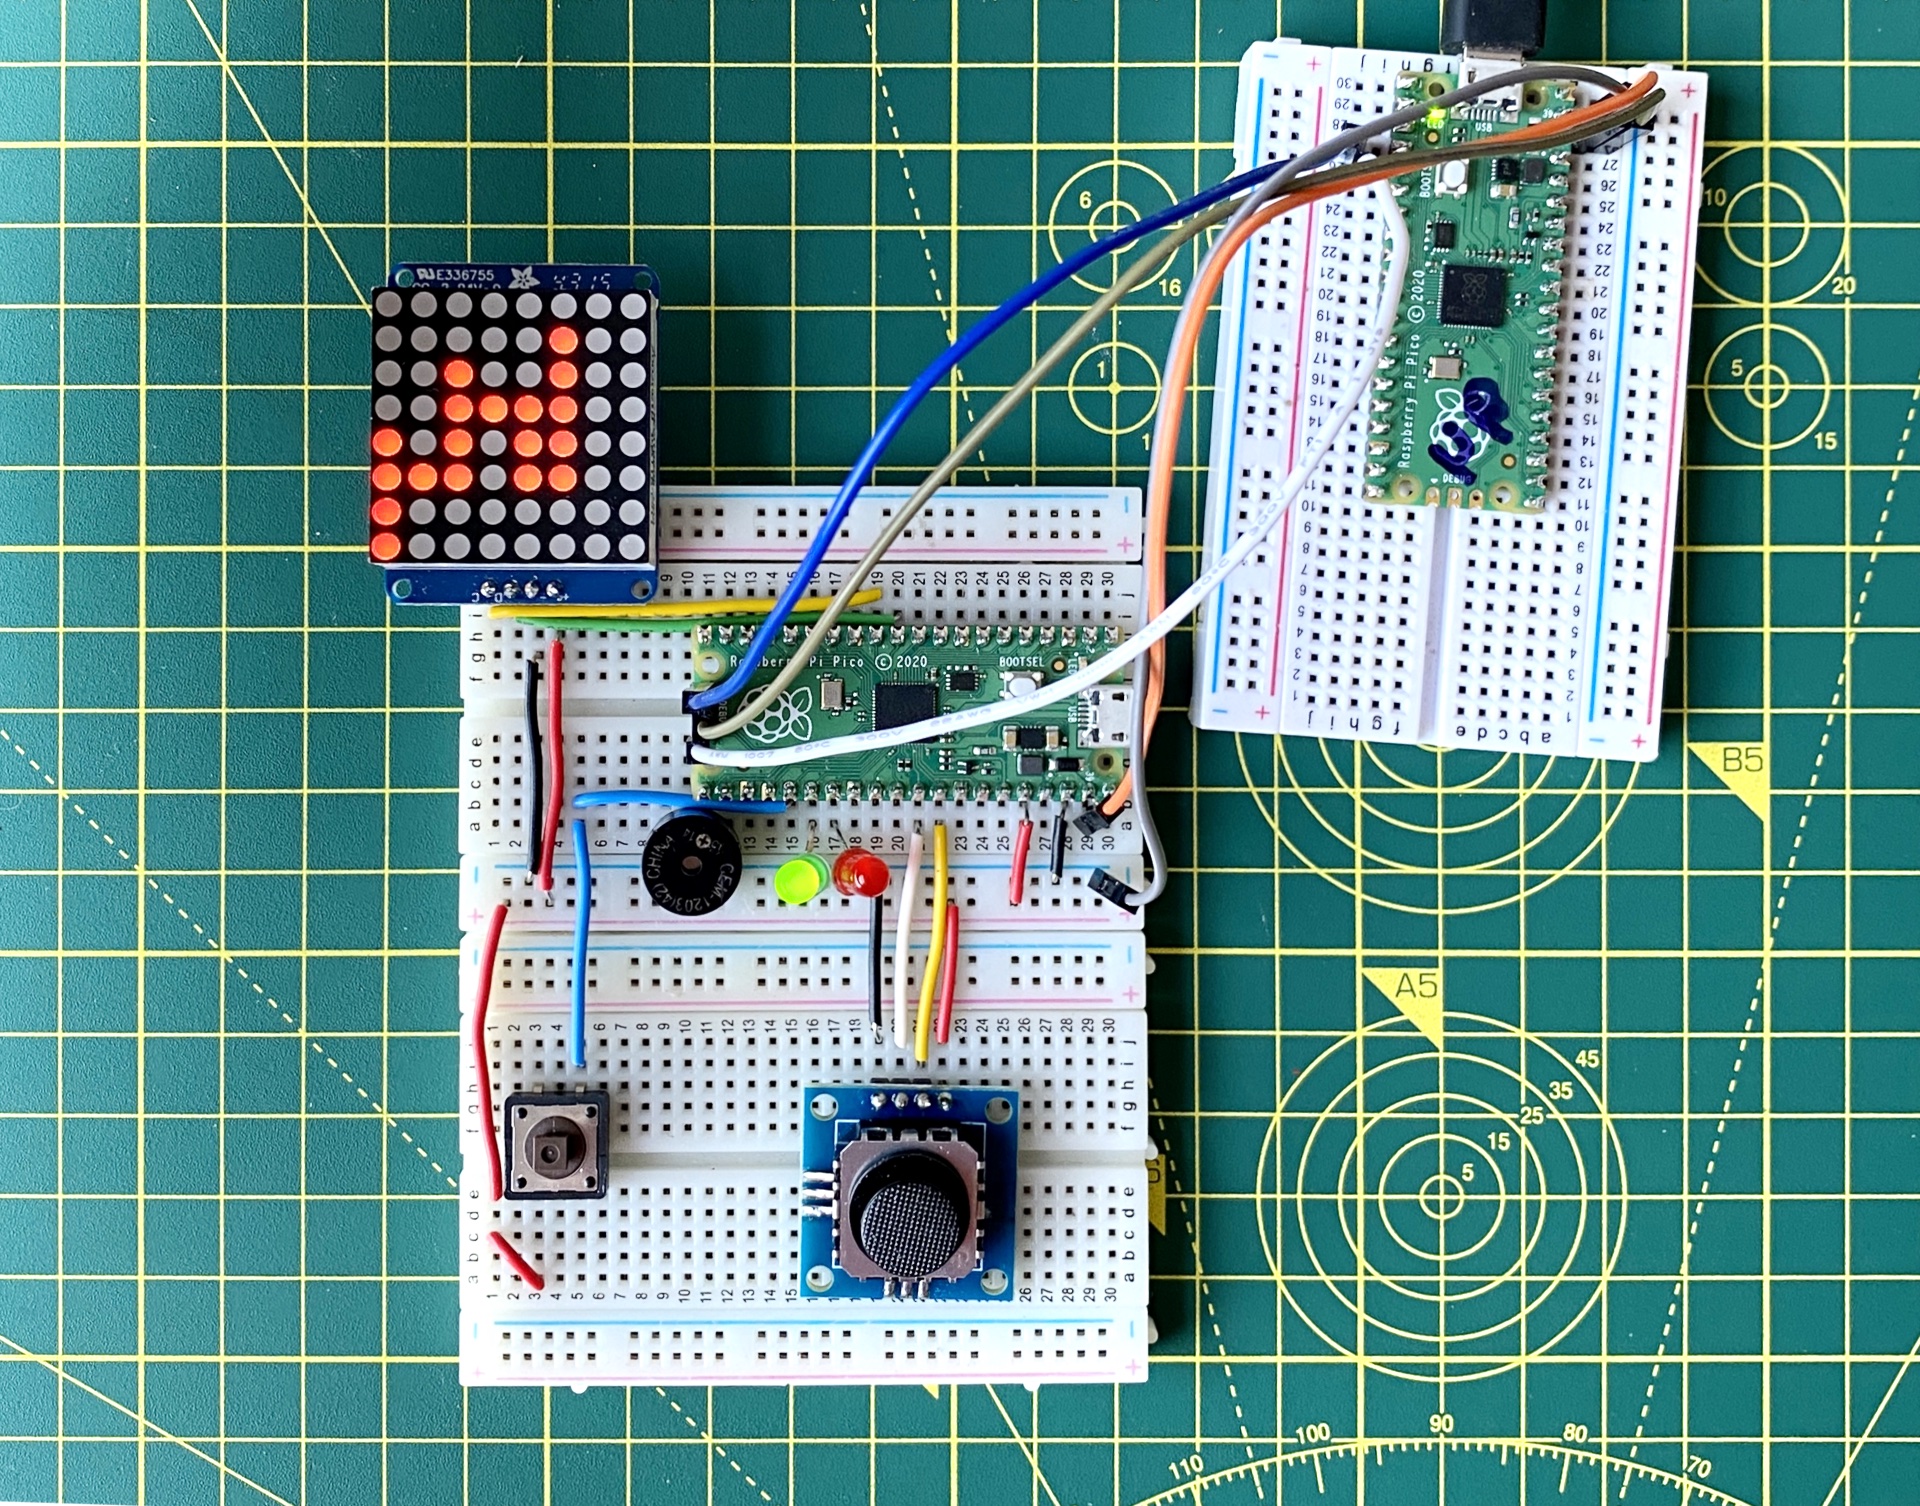
Note the debug board to the right — this is not part of the game
For the duration of the tone, measured using the Pico’s microsecond timer — time_us_64() — the code oscillates the pin connected to the speaker in proportion to the required sound frequency. Result: a suitable tone. The duty cycle is 50:50, pin on:off, which results in the maximum volume.
It’s crude, but it works. A better approach would be to use the Pico’s pulse-width modulation (PWM) output, and I may look at that for a future version. You may like to try to implement it yourself.
Finally, the animations are of the classic frame-by-frame type. Each frame is a string of bytes, one byte of each column of pixels on the LED.
The glittering of the trophy awarded for defeating the Wumpus is generated by rapidly changing a static image’s brightness.
More on the Raspberry Pi Pico
- How to build a cellular IoT device with the Raspberry Pi Pico — part two, the code
- How to build a cellular IoT device with the Pico — part one, the hardware
- How to pop up a Picoprobe from the Adafruit QT Py RP2040
- Raspberry Pi Pico proxies: the Pimoroni Tiny 2040 and the Adafruit QT Py RP2040
- Introducing C++ programming on the Raspberry Pi Pico
- Enjoy some old school 3D arcade action — courtesy of the Raspberry Pi Pico
- How to debug a Raspberry Pi Pico with a Mac, SWD and… another Pico
- How to Program the Raspberry Pi Pico in C on a Mac
- A First Look at a MicroPython Marvel: the Raspberry Pi Pico

Pingback: Hunt the Wumpus on Raspberry Pi Pico #piday #raspberrypi @Raspberry_Pi « Adafruit Industries – Makers, hackers, artists, designers and engineers!
Lovely project write up. I’ve really enjoyed and learnt a lot from your Mac / Pico dev articles.
Interesting Project. I think I will import theis C programme to a Raspberry Pi 3.
Pingback: Play Hunt the Wumpus on your Raspberry Pi Pico - Raspberry Pi Pod and micro:bit base