
Pimoroni is without doubt one of the most colourful companies to have come to market in support of the growing community of Raspberry Pi fans. The firm shot to fame last year when it released Pibow, one of the first cases for the Pi.
The box, made in Pimoroni’s Sheffield HQ, is a perspex affair formed from layers of laser-sliced coloured perspex and stamped with the Pi’s fruity logo, which just so happens to have been whizzed up by Pimoroni co-founder Paul Beech.
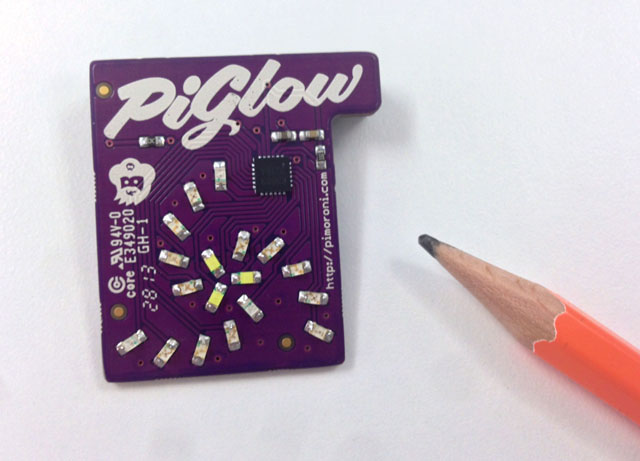
Pimoroni sells a stack of other accessories, which are all brightly coloured, and its latest offering continues the theme: PiGlow, a wee clip-on card packing 18 colour LEDs, three each of red, orange, yellow, green, blue and white arranged in a fixed triskelion pattern.
That might make the PiGlow seem less useful than, say, Ciseco’s 126-LED array add-on, Pi-lite, which can be used as to display both text and graphics. But to take that view is to experience a failure of the imagination.
The PiGlow makes for a rather good indicator display which, because it’s so small, can fit neatly inside a Pi case, including my own SB Components case bought for a fiver.
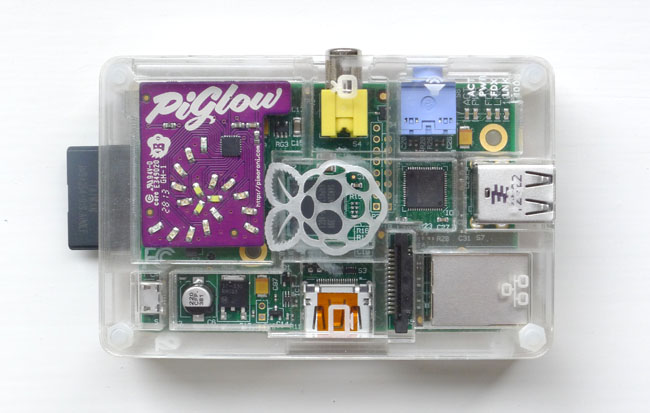
Speaking of cases, I first thought it odd that Pimoroni made the PiGlow’s board L-shaped. The main area of the board is narrower than the female GPIO (general-purpose input/output) connector mounted on its underside. Why, I wondered, not simply make the board the same size as the connector? And then I realised that were that the case, it wouldn’t fit inside a Pibow, which has internal spars to mark out the Pi’s main components.
Setting up PiGlow requires some tweaks to be made to your Pi’s system files. First, /etc/modules needs to be edited – I use nano; enter sudo nano /etc/modules at the command line – and then add two lines at the end of the file:
i2c-dev
i2c-bcm2708
Hit Ctrl-O to save the file, then Ctrl-X to quit.
Next edit /etc/modprobe.d/raspi-blacklist.conf using nano, but this time ‘comment out’ these two lines:
blacklist spi-bcm2708
blacklist i2c-bcm2708
so they end up as:
# blacklist spi-bcm2708
# blacklist i2c-bcm2708
The ‘blacklist’ command marks tells the Pi’s operating system, Linux, to ignore these two drivers. The # tells Linux everything that follows is just a message for programmers, so when the Pi starts the two drivers are not ignored. Yes, you could simply delete the lines, but adding the code for a comment, the #, makes it a lot easier to reinstate the command later. Either way, save the file and quit the editor.
Finally, install Python’s smbus support module:
sudo apt-get install python-smbusInstalled on the Pi’s GPIO pins, the PiBow is controlled through the little computer’s I2C bus. It draws its power from the Pi too. Pimoroni provides clear instructions online to help punters activate the Pi’s I2C drivers, and includes the datasheet for the SN3218 LED controller chip, which lists the part’s 24 settings registers and the values that need to be written to them to activate any or all of the LEDs and to set the brightness of each one.
With that information, it’s easy to program the PiGlow in whichever way your preferred language communicates with the relevant GPIO pins. In Python, the Pi’s prime language, you use the smbus module – you’ll need to install this first; instructions are provided – to write command codes and data out to the controller chip.

That’s not too onerous a programming tasks, but it’s been made much easier by Pi community members Jason Barnett and Ben Lebherz, who have built Python modules that tuck the SN3218’s codes and the smbus stuff away behind more user-friendly commands. This allows you to do handy stuff like, say, turn on all the blue LEDs, or activate all the LEDs in one of the triskele’s arms, without having to know which particular LEDs they are, although you can control them all by their ID number too.
To install PyGlow, enter the following commands in LXTerminal or at the command line:
mkdir pyglow
cd pyglow
wget https://raw.github.com/benleb/PyGlow/master/pyglow.py
They’ll create a directory called pyglow in your home folder, switch to it, and then download the Python code into it. Once you’ve done, make sure you reboot your Pi – I forgot, and if you do too, your PiGlow scripts won’t work.
sudo shutdown -r nowThe scripts need to be run as superuser, which is a pain if you write your code in a GUI application like Geany: you’ll have to execute the program manually with the sudo command in LXTerminal.
Barnett, Leb and Pimoroni also provide a handful of examples to get you started and to inspire you with clever tricks like using the PiGlow to indicate the time of day or the level of CPU activity. I can see folk using the PiGlow to flash up notifications for Twitter timeline updates and incoming emails, for example, or for tracking almost any other aspect of system activity in a slightly more interesting way than a single flashing light.

And then there’s always a whole mess of colourful animated light shows you can knock up for a laugh – it pumps out a fair bit of illumination at maximum brightness.
This little script runs the coloured lights in sequence, out from the centre and then back again, looking until you type Ctrl-C at the command line:
from pyglow import PyGlow
from time import sleep

pyglow = PyFGlow()

try:
    arm = 1              # LED colour
    add = 1              # LED colour increment
    lightlevel = 175     # LED brightness
    sleeptime = 0.2      # Pause time before switching off LEDs

    while True:
        pyglow.color(arm, lightlevel)
        sleep(sleeptime)
        pyglow.color(arm, 0)

        arm = arm + add      # Move on to the next colour

        if arm == 7:         # LED colour now out of range?
            arm = 5          # Then start stepping backwards
            add = -1

        if arm == 0:
            arm = 2
            add = 1

except KeyboardInterrupt:    # If the user presses Ctrl-C
    pyglow.all(0)            # Turn off all the lights
You can adapt the same code to illuminate each of the PyGlow’s arms, in sequence, for an animated catherine wheel effect.
The only real flaw with the PiGlow that I can see is that you can’t use your Pi’s GPIO pins for other things when it’s in place. The aforementioned Pi-Lite at least has a place to fix a pass-through connector. And on my sample unit there appeared to be some sort of leakage between the central white LEDs and the next set out, the blues. Turn on the blues and the whites illuminate faintly. This does not happen when other colours are active. Perhaps it’s a tiny amount of current leakage, or quite possibly it’s one set of LEDs exciting the phosphor of the adjacent set.
It turns out that the white LEDs are actually blue LEDs and they function by exciting a phosphor coating rather than actually generating white light directly. The coating is evident on the central white LEDs on the unlit board pictures, which have a slightly yellow cast missing from the other LEDs. Not an electrical issue, in other words.
Verdict
These are relatively minor inconveniences, though, especially when the PiGlow is only going to set you back nine quid and is largely a doddle to program. You can even get your kids using it with their Scratch projects thanks to coder Simon Walters. Kid coders will particularly like getting software feedback in the form of swirly coloured lights.
The PiGlow is a wonderfully fun, inexpensive doohickey. Order one today. From here, since you ask.
A shorter version of this article originally appeared on The Register

Nevermind, it seems wordpress comments erroneously breaks apart variable names. #FailSoHard
Just like everyone to note that you can’t just copy and paste this code in a python source file without fixing a few issues.
while True:
pyglow.color(arm, light level)
sleep(sleep time)
Should be :
while True:
pyglow.color(arm, lightlevel)
sleep(sleeptime)
And:
except keyboardInterrupt: # If the user presses Ctrl-C
Should be:
except KeyboardInterrupt: # If the user presses Ctrl-C
Thanks, Chuck. Code fixed now. Given your follow-up comment, whether it’ll stay fixed is another matter…