
A one-time colleague of mine recently put me onto Tailscale, a rather nifty product that allows you to wrangle all of your computers, phones and more into a single, secure and Internet-spanning virtual private network (VPN). I decided to give it a try and I’m very impressed with its performance and ease-of-use — the latter very important for someone like me who’s not a network guru.

Tailscale binds devices into a private network, called a ‘Tailnet’. No data flows via Tailscale itself: it focuses on the mapping of devices’ IP addresses (typically provided by a host network’s DHCP server) to their Tailnet addresses and to keep that information up to date so that as soon as you take, say, your laptop out and about, another machine that has access to it can still reach it, whatever network it eventually connects to and whatever Network Address Translation (NAT) is applied.
Tailscale mediates the process of machine-to-machine connection and authentication. Actual machine-to-machine communication is end-to-end encrypted with WireGuard.
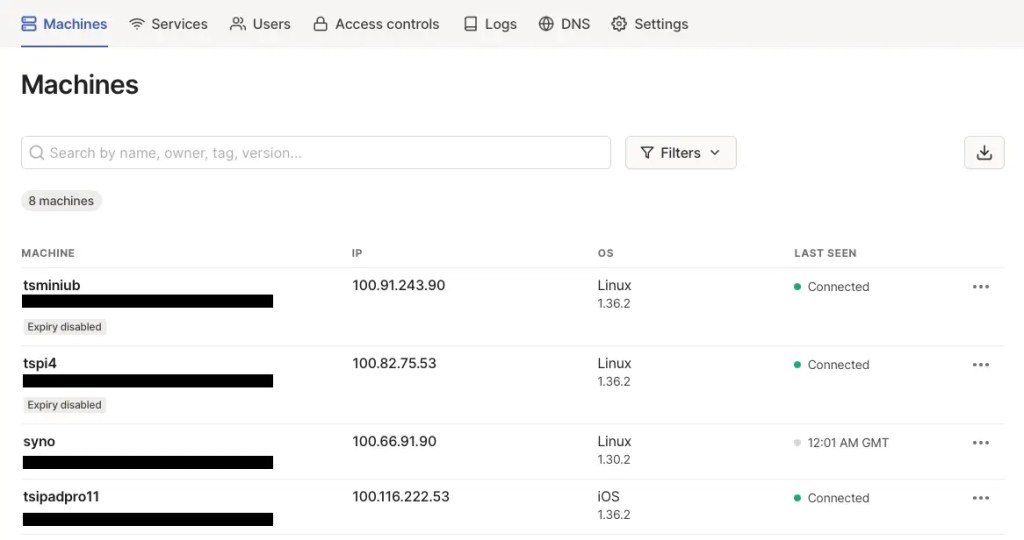
I’ve now got Tailscale running on a Raspberry Pi, a couple of Macs, a Ubuntu box, an iPad, an iPhone and a Synology NAS. Windows and Android are supported too. My use-cases are not complex: in the first case access to the NAS, second to make my Pi-hole accessible via any machine, and thirdly to SSH from my office Mac to my home Pi. These are all tasks you can set up manually, of course, but you need a lot of network security expertise if you’re to expose these systems safely through your own network to the public Internet. Tailscale saves you from almost all of the hassle and — more importantly — the worry.
Tailscale’s client installers are comprehensive so that pretty much all you need do is sign in using an established Single Sign On (SSO) provider. Google, Microsoft, Okta and many others are supported. Do this on all the machines you want in your Tailnet.
One point to note: macOS is supported with multiple install options. I tried the Mac App Store version first, and it’s fine for my MacBook Pro, but as it runs in userspace, you can’t have it operating when you’re signed out of the machine. So for my desktop Mac, I installed the CLI version via Homebrew. This runs as a service so it’s always available.
Your Tailnet has its own 100.x.y.z IP address range, but Tailscale also incorporates a DNS mechanism to bind addresses to machines’ names.
Internet traffic with servers outside your Tailnet doesn’t pass over the VPN, but you can — as I do — have it route DNS requests to your own choice of global DNS server. I use a Pi-hole on my home network, and it’s configured to relay uncached lookups to Cloudflare’s public DNS-over-HTTPS service, which I’ve mentioned before. By setting the Pi-hole as my Tailnet’s global DNS provider, all Tailnet-connected machines’ DNS queries will go through it, even requests from machines located beyond my home network.
Tailscale has a nice doc on setting it up. There’s a catch though: accessing the Pi-hole’s web UI via Tailnet forces HTTP on you, not HTTPS. That’s fine: you don’t need to verify the identity of a server you know all about and is inside your VPN. But Pi-hole grumbles and issues dire warnings nonetheless. Tailscale will show you how to enable HTTPS communications in general, but you need to do a little under-the-hood work on Pi-hole’s default web server, lighttpd.
Here’s what to do:
- SSH into your Pi-hole.
- Run
tailscale cert. This preps Let’s Encrypt certificates and a private key for you. - Run
cat /path/to/crt /path/to/key > /path/to/pem. - Run
sudo chown www-data -R /path/to/pem. - The standard Pi-hole install lacks the required OpenSSL binding, so install it now:
sudo apt update && sudo apt install lighttpd-mod-openssl. - Jump to the
lighttpdconfig directory:cd /etc/lighttpd. - Edit the ‘external’ config with
sudo nano external.confand add the following code:
server.modules += ("mod_openssl")
setenv.add-environment = ("fqdn" => "true")
$SERVER["socket"] == ":443" {
  ssl.engine = "enable"
  ssl.pemfile = "/path/to/pem"
  ssl.openssl.ssl-conf-cmd = ("MinProtocol" => "TLSv1.3",
                              "Options" => "-ServerPreference")
}

$HTTP["host"] == "<machine_name>.<tailnet_name>" {}
Note <machine_name>.<tailnet_name> is the domain name produced when you create the certificates; tailscale uses this for the certificate and key filenames.
- Restart
lighttpdwithsudo systemctl restart lighttpd. - Access the Pi-hole at
https://<machine_name>.<tailnet_name>/admin/login.php.
I took the opportunity to install the ufw firewall manager on the Pi and use it to close all of the machine’s ports to traffic except for packets coming in via the Tailnet:
sudo ufw allow in on tailscale0
The latter is the network interface Tailscale adds to each client, and the ufw rule ensures only communications from Tailnet member devices are allowed through.
A use-case I implemented subsequently is to run an nginx-hosted web server as a test bed when I make changes to my public website. It’s running on my Ubuntu machine. Normally I’d used a service like ngrok to provide a secure tunnel between the server and the outside world, but that doesn’t also provide the connections to other machines I need.
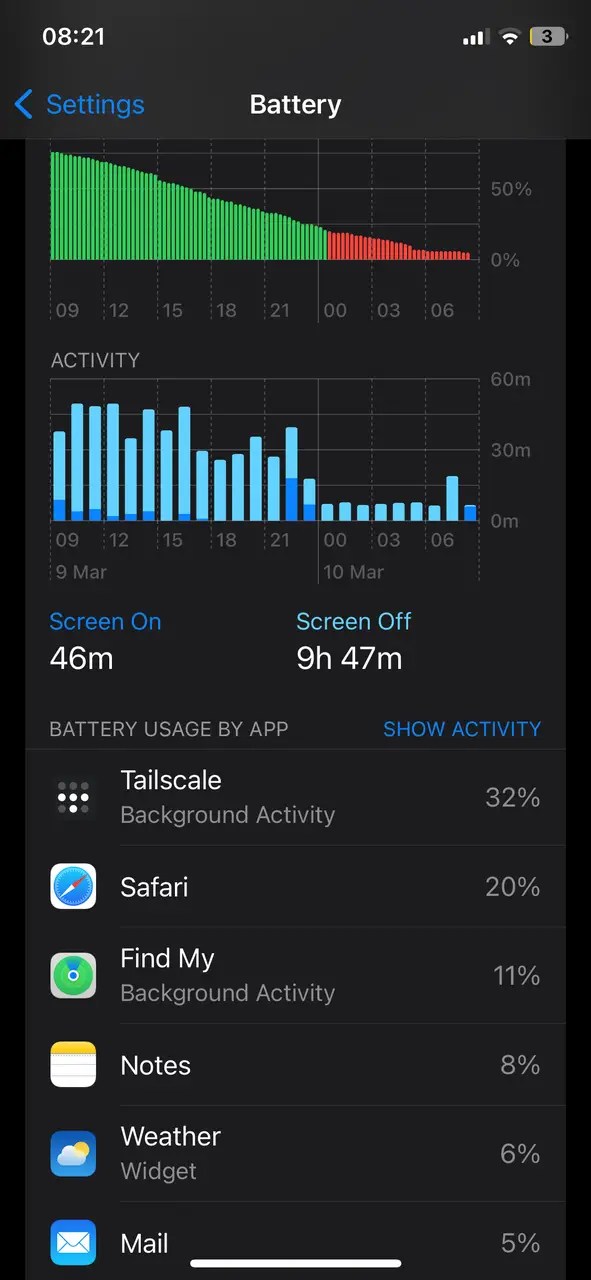
Issues? Not many so far. I noticed the iOS app on the iPhone appears to be a bit of a battery hog, but that’s not a primary Tailscale usage platform for me so I can live with that for now. And it may be a known issue; I’ve not yet checked.
Otherwise, I’m very happy with how it’s all working out. Well worth a look if you have comparable use-cases to mine in mind.

Hi Tony. There are numerous issues for iOS battery issues; this is the latest: https://github.com/tailscale/tailscale/issues/3363.
These battery issues don’t appear with the Wireguard app. But even with battery drain, Tailscale is excellent.