
Google the title of this post and you will get plenty of results, but all almost all of them steer you toward opening the image or images in macOS’ Preview app and exporting to PDF. Yes, this method works, but it doesn’t give you much control over the process, and it’s not scriptable.
My approach was to write an Automator workflow to select the images, put them in alphabetical order of filename, write them to PDF and then apply a custom Quartz filter to the PDF. There is a Automator action called Compress Images in PDF Documents, but I found that it doesn’t appear to compress the images: choose any of its settings, and the output PDF is always the same size!
Having spent some time over the past year writing bash scripts for a variety of other tasks — for example, the one outlined in a previous post — I decided to see if I could replace the Automator workflow with something able to take input when it’s run.
For image manipulation, I make extensive use of macOS’ built-in sips tool. This will convert an image to PDF, but it’s not able (it seems; tell me if I’m wrong) to convert multiple images into one PDF, which is what I want to do.
Older versions of Automator’s PDF creation and Quartz filter application actions were written in Python, which you could extract by digging into macOS’ System folder. This is no longer the case, at least in Mojave and above. So I decided to write my own script. This is possible to do in Python, but it introduces dependencies to allow Python to make use of the macOS SDK’s Objective-C methods. I wanted to write it in Swift — and learn how to create a macOS command line project in Xcode.
This is actually very straightforward, and writing a tool to parse command line arguments that provide a source folder of JPEGs, and a destination folder and name for the PDF file, proved easy thanks to the Quartz framework’s PDFPage and PDFDocument objects.
You can find the source code in my pdfmaker GitHub repo, but the gist is that you run through a folder’s files, ignore all but the JPEGs, load each one in as a NSImage object, which you use to create page data that gets added to a PDFDocument instance:
// Prepare a PDF Document
var pdf: PDFDocument? = nil
var pageCount: Int = 0

// Iterate through the list of files
for i in 0..<files.count {
// Get a file, making sure it's not a . file
    var file: String = srcDir + "/" + files[i]

    // Get the file extension
    let ext: String = (file as NSString).pathExtension.lowercased()

    // Only proceed if the file is a JPEG
    if ext == "jpg" || ext == "jpeg" {
        // Load the image
        var image: NSImage? = NSImage.init(contentsOfFile: file)
        if image != nil {
            // Create a PDF page based on the image
            let page: PDFPage? = PDFPage.init(image: image!)
            if page != nil {
                if pageCount == 0 {
                    // This will be the first page in the PDF, so initialize
                    // the PDF will the page data
                    if let pageData: Data = page!.dataRepresentation {
                        pdf = PDFDocument.init(data: pageData)
                        pageCount += 1
                    }
                } else {
                    if let newpdf: PDFDocument = pdf {
                        // We're adding a page to the already created PDF,
                        // so just insert the page
                        newpdf.insert(page!, at: pageCount)
                        pageCount += 1
                    }
                }
            }
        } else {
            print("[ERROR] Could not load image for file \(file)")
        }
    }
}

// Save the PDF to disk
if let newpdf: PDFDocument = pdf {
    newpdf.write(toFile: outputPath)
    return outputPath
}
As you can see from the code snippet above, creating the PDFDocument instance requires slightly different code that just adding a PDFPage instance to an existing PDFDocument instance, which is why the code performs the if pageCount == 0 check.
That done, the next step in replicating my Automator workflow is to compress the images in the PDF. I initially tried to do this using the same approach: apply a Quartz filter to the PDFDocument. Apple’s documentation on this topic is sparse and inconsistent, and the usually reliable StackOverflow wasn’t much help either. This is clearly not a problem encountered by many macOS developers.
It’s implied that you load in an external filter (as created using macOS’ ColorSync Utility) and apply it when you write out the PDFDocument instance to disk. Maybe you do, but the Swift compiler wasn’t having any of it, so rather than spend time on that approach, I explored some alternatives.
The one I chose is to compress the image data before adding it to the PDF. This is just a matter of getting the loaded NSImage’s bitmap data (created from its tiffRepresentation property) and using it to create a new, compressed JPEG representation from which the code makes a new NSImage. Here’s the relevant chunk of code from the pdfmaker source:
func compressImage(_ image: NSImage) -> NSImage? {
    // Take an existing image, and compress it
    // See https://stackoverflow.com/questions/52709210/how-to-compress-nsimage-in-swift-4
    if let tiff = image.tiffRepresentation {
        if let imageRep: NSBitmapImageRep = NSBitmapImageRep(data: tiff) {
            let compressedData = imageRep.representation(using: NSBitmapImageRep.FileType.jpeg,
                                                         properties: [NSBitmapImageRep.PropertyKey.compressionFactor : compressionLevel])!
            return NSImage(data: compressedData)
        }
    }

    // Something went wrong, so just return nil
    return nil
}
The function returns the compressed image or nil, so that its caller can check whether the compression process was successful or not. With that code in place, I updated pdfmaker to look for the switch --compress followed by a compression factor: 0.0 for maximum compression to 1.0 for no compression.
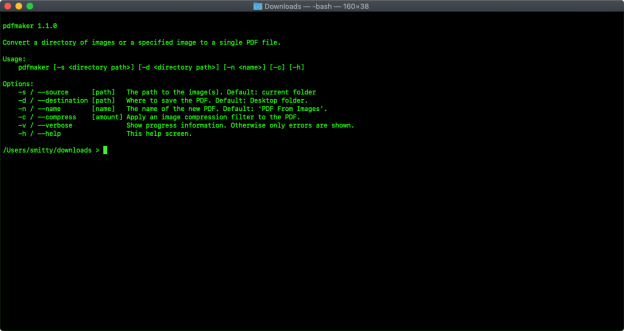
Here are pdfmaker’s options:
You can download pdfmaker from my project site, and the source code can be viewed on GitHub.
